Creating and setting up a new Meraki organization can be a cumbersome and confusing process, especially for network engineers that are new to working with dashboards.
For this reason, in this article we’re going to look at how you can create new Cisco Meraki organizations. First we’ll discuss how to do this directly on the dashboard, after which we’ll guide you on how to completely automate this process using Meraki APIs. We’ll go through the entire provisioning process, from creating new organizations and networks, to putting devices within those networks.
Let’s dive into it.
Organizations are at the center of everything you do within Meraki. They connect your different sites/networks into one single entity. This is where all of your networks essentially live.
To get started with Meraki, creating your organization will be the first step. Unless you are a Managed Services Provider, this is the first thing you’ll see when you enter your dashboard.
If you work at an MSP, you will see the MSP Portal from where you can access all of your organizations. The MSP portal also stays active for companies that split their infrastructure into multiple organizations.
Managed Services Providers will often opt to have one organization per customer, although in some rare cases (which isn’t recommended) they can have them all in one organization as well.
You can choose to manage all of your networks within one organization or split them up. This depends on your use case and network structure, although most IT teams prefer to have everything under one roof as this makes things much easier to manage. This choice does have some implications for Site-to-Site VPN settings and Licensing so make sure you consider those before making your decision.
The first thing you’ll need to do before you can get started is create an account on dashboard.meraki.com.
Once you have your account, you’ll be led directly to the organization creation screen. This part is relatively straightforward and you just have to be sure to closely consider the region you select. Although this will most likely just be where you are located, it does have strong implications for compliance as it determines where your data will be stored on Meraki’s servers.
To avoid any legal issues, it’s best to double check and be sure about which region you choose.
By configuring an organization, you’ve essentially built the house. Next let’s put some networks in there and make it a home so that our Cisco Meraki devices will have a place to live.
Once on your dashboard, you can simply hover over the Organization Tab and click on Create Network. You can also click on Create a new Network from the Networks part of the dashboard. Both will take you to the creation screen where you simply have to choose the Name, Region and Type for your Network. Unless you’re absolutely sure that a certain network will only have one type of device for its entire life, it makes sense to go with a combined network as you have very little to lose by doing so.
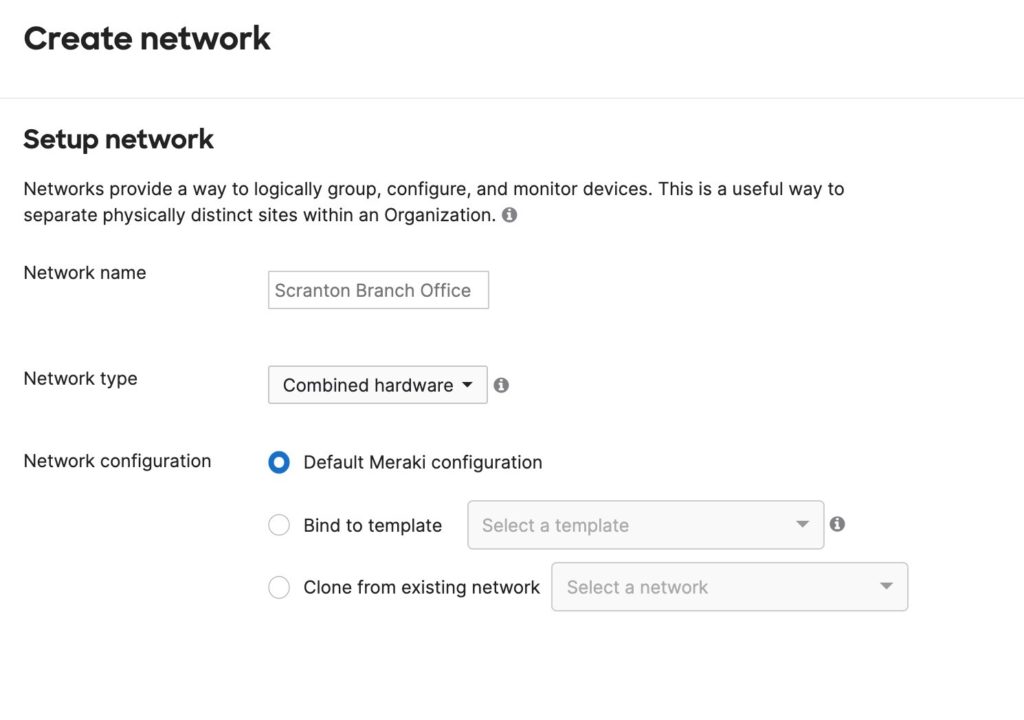
Something special about networks on Meraki is that you can use templates with them. The Meraki Configuration Templates are an incredibly useful tool as they allow you to replicate configurations for new networks you create based on what you already have in the template. You could also use the clone feature when creating networks to do this, but what’s unique about the templates is that through them you can simply push out changes to all those networks at once, as these will be bound to the configuration template.
Even though you are allowed to have multiple templates within a single organization, the Meraki templates can also become a source of pain as they force you to have the exact same configuration on each network that is bound to the template. You will gain much in terms of automation and time saving but you may lose out on flexibility.
Make sure you consider the requirements of your environment closely before choosing to go with or without templates, because unbinding a network from a template will cause it to lose its configurations!
Templates are also only available within the organization they are created in so that might be something to consider based on your setup.
With your networks now set up, we need to fill them with devices to get them up and running.
Simply go to Organization -> Inventory to claim your Cisco Meraki devices. This will be the first step to add them to your organization so you can then place them inside your networks. You’ll need your device serial numbers to be able to do this, which you should have received from Meraki sales. If your devices are already in another organization they’ll need to be unclaimed from there before you can claim them.
Assuming you’ve gotten new devices, simply enter the serial numbers and click claim to have the devices ready to go in your inventory. If your devices are already in another organization they’ll need to be unclaimed from there before you can claim them.
Directly from your inventory, you can then select the devices individually and click on the “Add to” Button which will allow you to choose which network you want to place those devices in. You can then do this for every device.
Now you’ll have everything ready in your Cisco Meraki dashboard to simply be configured however you like.

Although everything here is relatively easy, it may not be if you have to do it hundreds of times.
If you’re new to Meraki you probably haven’t learned about the Cisco Meraki APIs. This tool allows you to automate all the things we’ve discussed above. It is highly recommended that you discover the APIs as they could allow you to save much of the time you’d otherwise spend doing repetitive tasks on the dashboard as you provision a new Meraki organization.
This does however depend on the scale of your operation. If you’ve got only a handful of networks and devices, then perhaps simply going through the dashboard would be optimal for you.
If you’re working in a real environment though, chances are you’re going to have more than a handful. This is where the APIs come in. I’ve actually created a course on How to use the Meraki APIs where you can learn how to automate various networking tasks, starting from simple monitoring to provisioning all of your networks simulteanously. I’m certain there’s great value in it for you if you intend to work with Meraki regardless of what the context is.
If you wish to take advantage of automation but do not want to program everything yourself, you can use the Boundless Deployment tools available to you. Our off-the-shelf solutions are built on the Meraki APIs and allow you to instantly take full advantage of network automation without having to build things from scratch. We’ve helped many enterprises and MSPs save countless hours of manual labor through years of expertise with the Cisco Meraki APIs.
It is highly recommended that you discover the APIs as they could allow you to save much of the time you’d otherwise spend doing repetitive tasks on the dashboard as you provision a new Meraki organization.
Working with Cisco Meraki can be daunting at first but is actually rather simple once you get the hang of it. Meraki has a great Getting Started guide you can take a look at which goes into further details about some of the processes we’ve outlined above.
If you’d like to really get comfortable I’d suggest taking a look at the Learning Hub on the Cisco Meraki community. The ECMS1 is offered here completely free and is the best place to get started if you’d like to get a holistic understanding of Cisco Meraki. I’d also really recommend the community itself as it is a great place to learn more about Meraki!
Get a deep understanding of how to automate low-value and redundant network operations using the Meraki APIs.
1207 Delaware Ave #552, Wilmington, Delaware 19806
Americas: +1 (347) 464-6510 - EMEA: +33 (0) 181 22 12 80
We are proud to announce the launch of our new brand identity, marking a significant milestone in our evolution. This rebrand reflects our commitment to continuous innovation, agility, and automation — always moving forward.